… To Get Professional Looking Cross Stitch
It doesn’t matter whether you are a beginner or an experienced cross-stitch designer; there are always new things you can learn to make your projects look more polished. Getting that professional look takes practice and skill, but there are also some tips and tricks that professionals use to make their designs rise above rest.
Looks Great from the Front and Back
When you begin cross-stitching one frustrating aspect of the craft is the backside of your fabric that looks like someone threw down a ball of multi-colored floss. There are however, a few ways you can keep your back looking almost as nice as the front.
- First, you can make extra effort to keep your stitches consistent throughout your whole piece. By using just one cross-stitch method you will keep the back of your piece looking as good as the front.
- You can end your threads by weaving them under the same color. If there is not enough of that same color, try to weave it under a similar color in the back.
- Finally, you can avoid carrying your threads at all. Just end them and restart.
Smooth Wrinkle-Free Fabric
Fold lines and wrinkles can become a serious problem and are difficult to get out of any cross-stitch fabric. After using hoops or holding your fabric but they are often inevitable. You can use three methods to get the wrinkles out of your fabric and keep it looking professional.
- To prevent fold line I store my fabric by rolling it on an empty cardboard roll that wrapping paper came on. To secure it to the roll I slit open an empty paper towel roll length wise, open it up enough to slip it over the top of the fabric.
- You can use heat or cold to get out the wrinkles in your fabric. To use your freezer, you can simply wet the fabric along the folds then slip it into a paper bag so it can lie flat. Lay the piece as flat as possible in the freezer until it is frozen solid. Removed it from the freezer and immediately iron it until it is thawed and dry. Then let it rest overnight on the ironing board before moving it. Also, you can wet the folds in the fabric and place it in the microwave for 30 seconds. Then iron it. Let the piece cool before you move it.
- I was at our local fair this year and saw a beautiful stitched piece that was marred by 2 big hoop rings that the stitcher was unable to remove. The trick is to pop your piece out of the hoop when you aren’t stitching to allow the fibers to regain their shape.
Professional Looking “French Knot”
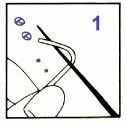
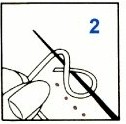
One frustration for many cross-stitchers is the French knot. It is a difficult knot to do without it unraveling or coming through the back of the fabric — and forget about using delicate floss like metallics. Many stitchers also complain that they can never get all the knots to look the same size on the fabric. However, there is an alternative that will give your work a professional look — the Colonial Knot.
To see a good video on how to do the COLONIAL KNOT go to:
http://www.needlenthread.com/2007/03/embroidery-stitch-video-tutorial-2.html
I have also included a diagram and explanation to go along with the video.
| Colonial Knot in place of a French Knot | |
|
|
|
|
|
|
And there you have it. Three great tricks performed by the professionals… and now you know too!


